- Campus Services
- Budget Office
- Campus Controller
- Campus Planning and Design
- Career and Professional Development
- Event Operations
- Facilities Management
- Fire & Life Safety
- Institutional Compliance and Internal Audit
- Institutional Research and Decision Support
- Legal Affairs
- Mail Services
- Marketing and Public Affairs
- Parking Services
- Public Safety
- Sustainability
- Copy Jobs
- Campus Resources
- Marketing and Public Affairs
- Software
- List of Approved AI Software
- Adobe Acrobat Pro
- Adobe Creative Cloud
- ArcGIS
- Canva Pro
- Canvas
- Chapman Syllabus
- Chemdraw
- Concur
- CrashPlan
- Dedoose
- DocuSign
- Dropbox
- Encryption Software
- EndNote
- Grammarly Premium
- Google NotebookLM
- Google Workspace
- Interfolio
- Mathematica
- MatLab
- Mnova
- Notability
- NVivo
- Microsoft 365 Tools
- Panther Analytics
- Poll Everywhere
- Qualtrics
- SAS
- SPSS
- STATA
- Survey and Form Comparison
- Microsoft Virtual Desktop (VLAB)
- Yuja Video Platform
- Zoom
»Code42 CrashPlan Software
Code42 CrashPlan is a full-computer backup solution for Windows, Macintosh, and Linux computers. Each faculty and staff member with critical data located on their local computer is entitled to protect up to 4 devices.
We recommend faculty and staff with important data saved locally to the device use the CrashPlan software. If your files are located on a Chapman file share, DropBox, Google Drive, OneDrive, or other protected sources, then the software may be unnecessary. When in doubt, contact the IS&T Service Desk for assistance in configuring an appropriate level of protection for your device.
How does it work?
After installing the software on your computer, enter your email address (twice), followed by your Chapman password. The software will automatically start backing up the device. After the first full backup, your files are scanned for changes and automatically protected every 15 minutes, assuming your computer is connected to the Internet.
Where is my data saved?
By default, your data is encrypted locally and saved in the CrashPlan cloud within the United States. Storage is unlimited. Encryption keys are saved on the Chapman server, which means the CrashPlan vendor is unable to read your data. Thus, it is suitable for almost all information types. Even so, we recommend that anyone with high risk data concerns work with IS&T Information Security prior to implementing CrashPlan.
Can I protect my personal-owned computers?
You may protect your personal computers if they contain Chapman-related materials, however, backups of personal content are discouraged. When installing on a personal device, follow procedures to deselect all files but your chapman content. DropBox, OneDrive, or Google Drive are preferred alternatives.
Chapman employees are eligible for a 25% discount on the home version of CrashPlan. Click here and register with your Chapman email address on checkout.
Download and Installation Instructions
Code42 CrashPlan can be installed on a variety of computers, as shown below. Step-by-step installation instructions are provided below for Windows and Mac computers. Please follow them to ensure the software is installed correctly.
Note these links have been updated for version 6.9.4. Clicking any of them will trigger an automatic download of the selected software installer.
Installing on Windows (64-bit or 32-bit)
- Click on one of the links further up this page, either Windows 64-bit or Windows 32-bit.
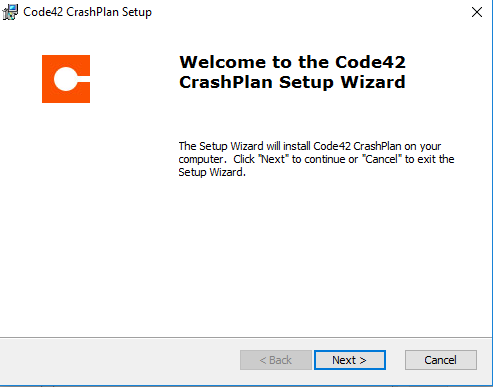
- Run the downloaded executable file. After a moment, the installation window appears.
Click Next.
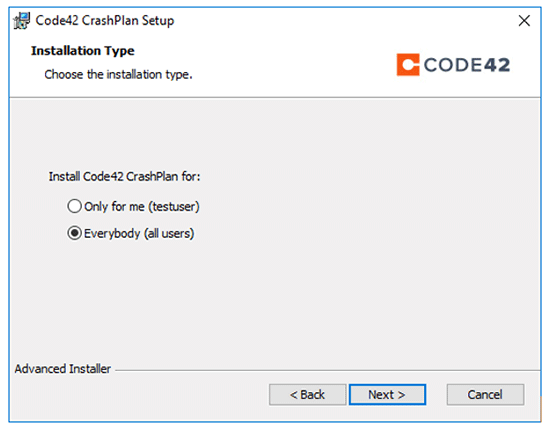
- If you have admin rights on your computer, leave the default Everybody selection. Otherwise, change the selection to Only for me. Click Next.
- At the Installation Folder screen, click Next, followed by Install.
- (if prompted) At the “Do you want to allow this app to make changes?” prompt, click
Yes.
NOTE: If you are prompted for a user account, please enter an account with administrative credentials. If you do not have an account, click Cancel, and restart the process, but select “Only for me” in Step #3. - Click Finish.
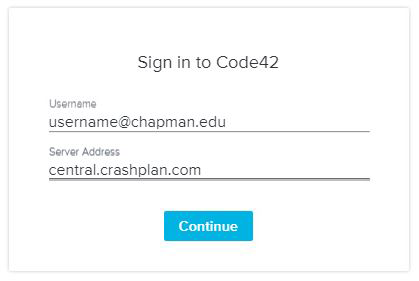
- At the Code42 screen, enter your email address and for server address enter clients.us2.crashplan.com. Click Continue.
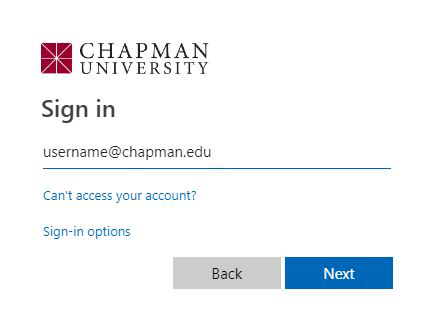
- At the Chapman University login page, enter your email address again, followed by your Chapman password. Click
Sign in.
- If successful, the Code42 software will display the "Welcome" message, and that your computer is now backing up.
 '
'
You are done. If you want to review the files being protected, or select additional drives (only the C: drive is protected by default), visit the Customizing Settings section on this webpage.
Installing on Macintosh (using Chapman Self-Service)
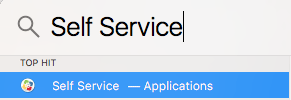
- Launch Self Service from Launchpad or Spotlight
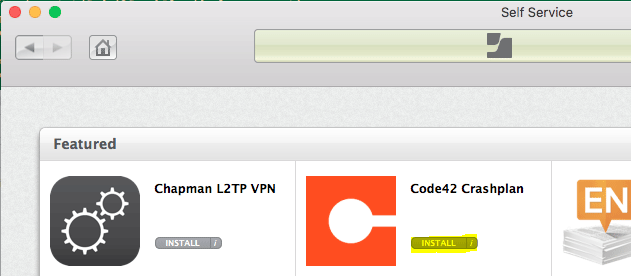
- Click the Install button to begin installing Code42 CrashPlan. The program will launch automatically
after installation completes.
- At the Code42 screen, enter your email address and for server address enter clients.us2.crashplan.com. Click Continue.

- At the Chapman University login page, enter your email address again, followed by your Chapman password. Click Sign in.

- If successful, the Code42 software will display the "Welcome" message, and that your
computer is now backing up.

- You are done. If you want to review the files being protected, or select additional drives (only the C drive is protected by default), visit the Customizing Settings
Installing on Macintosh (DMG Download)
NOTE: if you are installing on a Chapman computer we recommend using the Self-Service instructions instead.
- Download the CrashPlan software installation for Macintosh from the link above. Double-click
the file, so that it mounts on your computer.
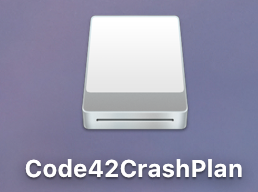
- On your desktop, double-click the Code42CrashPlan icon.
- Double-click the Install Code42 CrashPlan icon.
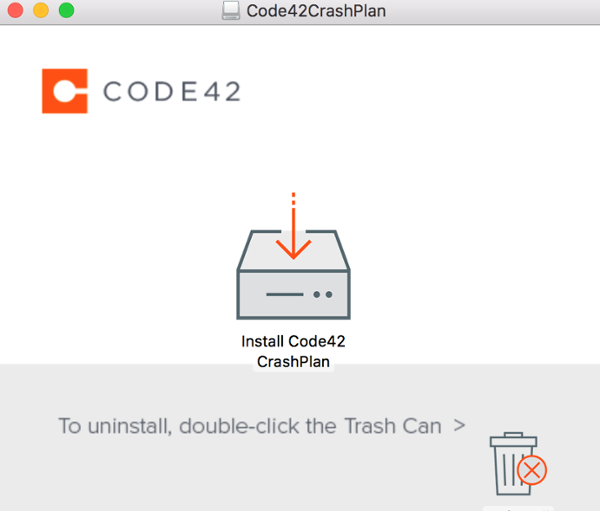
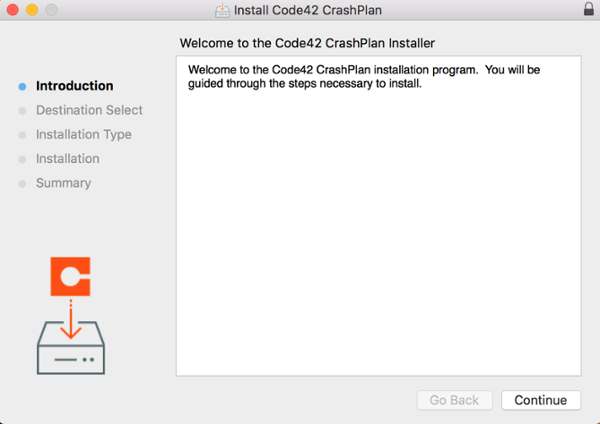
- Click Continue, then click Install.
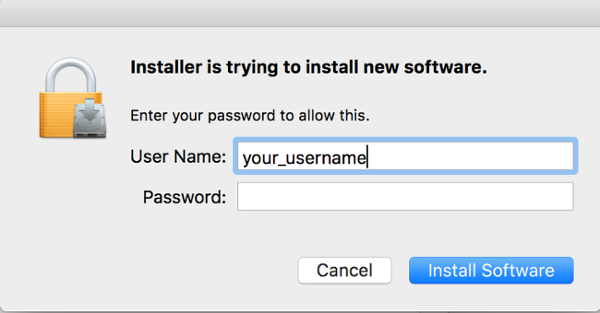
- (if prompted) Enter your username and password at the “Installer is trying to install
new software” prompt, and click Install Software.
- Click Finish. The Code42 software will launch automatically.
- At the Code42 screen, enter your email address and for server address enter clients.us2.crashplan.com. Click Continue.

- At the Chapman University login page, enter your email address again, followed by your Chapman password. Click
Sign in.

- If successful, the Code42 software will display the "Welcome" message, and that your
computer is now backing up.

- You are done. If you want to review the files being protected, or select additional drives (only your main harddrive is protected by default), visit the Customizing Settings section on this webpage.
Review and Customize Settings (optional)
- Launch the Code42 application on your computer.
- Click the Details button near your computer name.
- Click Manage Files.
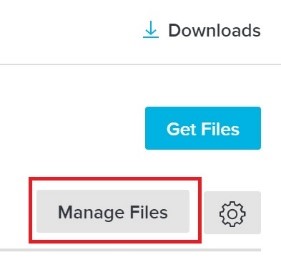
- All of the hard drives will be listed. Click into one of the drives to see individual
folders and make changes, if necessary.

Tip: If your computer has more than one hard drive, place a checkbox next to the additional drive(s) here.
- When finished, click Save or Cancel.
- Click the Settings gear icon.
- Review the default settings. When finished, click Done.
- Backup Schedule – Change these settings if you want to exclude backups during certain times of the day.
- File Exclusions – Enter any file extensions (e.g. mp3) that you do not want to protect.
- Destinations – Allows you to back up files to a local drive (advanced).
Restoring Files
- Before beginning, contact the IS&T Service Desk should you need assistance with your restore.
- Inside of the Code42 app, click Get Files.
- Use the As Of Today button in the upper right corner to pick a specific day’s files to restore, if necessary. By default, the most current files are shown.
- Navigate into each folder and identify the files/folders you wish to restore. Place checkboxes next to each file or folder you wish to restore.
- Click Get Files.
- In the Save selected files to folder, note the default restore location. Use the dropdown to change the restore location, if desired.
- Click Go. Your files are restored.
- Software
- List of Approved AI Software
- Adobe Acrobat Pro
- Adobe Creative Cloud
- ArcGIS
- Canva Pro
- Canvas
- Chapman Syllabus
- Chemdraw
- Concur
- CrashPlan
- Dedoose
- DocuSign
- Dropbox
- Encryption Software
- EndNote
- Grammarly Premium
- Google NotebookLM
- Google Workspace
- Interfolio
- Mathematica
- MatLab
- Mnova
- Notability
- NVivo
- Microsoft 365 Tools
- Panther Analytics
- Poll Everywhere
- Qualtrics
- SAS
- SPSS
- STATA
- Survey and Form Comparison
- Microsoft Virtual Desktop (VLAB)
- Yuja Video Platform
- Zoom
Need Help?
For questions or issues, please contact the IS&T Service Desk.
Email: servicedesk@chapman.edu
Call: 714-997-6600
